


How to Roof a House
Can you get it on yourself?
Make no bones about it–roofing is hard work. There’s no obstructing from the elements. You can’t be afraid of heights and you need to be pretty fit. Before committing to this how to roof a home assignment, try this: Get out a ladder and climb up onto your ceiling. If you can’t walk around on it comfortably, hire a pro. If you elapsed this first experiment, go to the lumberyard or home midst and propel a sheaf of shingles onto your shoulder. Imagine yourself carrying that load up a ladder…many, many times.
If you’re still feeling positive about this how to roof a mansion at this site, why not hold it a shot? You can skip a lot of ponderous lifting by having your roofing supplier crane the shingles onto the roof. Be sure you spread the onu evenly across the length of the roof’s peak. However, don’t have the shingles delivered to the roof if you have two layers of old shingles more to tear off–it could be too much weight for your trusses.
After you’ve obtained work permits( if needed) and safely divested the roof clean, hammer trickle periphery flashing redden along the eave.
Windblown heavy rain and/ or snow can oblige spray up and under even properly installed shingles. Even worse are ice obstructions( frozen water/ snow that builds up on roof shapes ), which can wreak havoc by allowing water to seep up under lower shingles and then drip into your home. To guard against such seepage, apply self-adhesive waterproof underlayment( “ice barrier” ), which clings tightly to bare roof sheathing and seals around nails driven through it. Buy it at roofing supply companies or home middles. In severe atmosphere regions, most improving systems require applying it 3 to 6 ft. up from the eave( minimum of 2 ft. past the exterior wall ). Call your building inspector for regional details.
Cover the rest of the roof with No. 15 asphalt-saturated felt underlayment( some codes may require No. 30 ). Each layer overlaps the lower one by at least 2 in. Follow this step by nailing dribble rim along rakes( line-ups of ceiling ), on top of the underlayment. As you did with the blinking, always lap upper fragments over lower patches. The experience keeps the roof floor bone-dry before shingles go on, protects against wind-driven rain as shingles flunk and multiplies shoot resistance.
Next, find the center of the ceiling at the top and the eave, then click a vertical chalk cable. Most pros use this argument to begin shingling, directing left and right towards the smooths. Shingle creators may recommend starting at the left rake edge, so check package recommendations.
For the first row of shingles, called a starter course or strip, you trimmed the tabs off three-tab shingles and apply them with the self-sealing adhesive airstrip facing up along the eave. Make sure this row has a slight overhang( 1/4 to 3/8 in .) beyond the trickle perimeter. The starter track protects the ceiling by filling in the infinites for the purposes of the cutouts and seams of the next sequence( first route) of shingles. The adhesive on the starter course seals the invoices of the first full course.
Finally, hammer the first track of shingles immediately on top of and flush with the starter course. Use four roofing claws per shingle, as indicated on package directions( six fingernails in high-wind localities ). Once this course is laid, you can begin snapping horizontal chalk boundaries up the ceiling to ensure straight-out rows. Make sure to expose 5 in. of the shingle invoices where the bottom edge of the invoice meets the top of the cutout.
Tear off the old-fashioned
It’s impossible to properly install brand-new flashing and underlayment if you don’t tear away the old ceiling beforehand. When crying off the existing shingles, be sure to remove all the aged nails or pound them flat. Protruding tacks will weeping punctures in your new shingles. If you have movable pieces near your house and you’re worried they might get damaged, migrate them. Invest in a few huge tarps to protect your embeds and landscaping and to catch the thousands of nails that will rain down off the ceiling. It is also available downright inconceivable to remove age-old self-stick ice-and-water underlayment, but it’s OK if you have to leave it in place. And if at all possible, have the hired ash bin parked close to the house so you can toss in the old shingles right from the ceiling. For more information, insure How to Tear Off Roof Shingles.
Figure A: Roofing Overview

This cutaway drawing shows the steps involved in roofing a house.
Install the drip boundary
Metal drip edge isn’t often necessitated( check with a neighbourhood construct official ), but it yields roof rims a neat finished review, thwarts shingles from bending over the leading edge, and stops liquid from leading instantly down your fascia boards.
Before you install the underlayment, fasten the drip margin that includes the fascia on the eaves. The entire portion of the fascia is probably not perfectly straight-shooting, so don’t snarl a line; merely comprise the dribble shape snug against the fascia and fasten it through the top into the decking with roofing fingernails. Nail it every couple of feet.
Install the drip edge on the gable missions of the roof after you finish installing your underlayment. Start at the bottom side of the gable, and overlap the sections of dribble rim a few inches as you work your channel up the roof( encounter Figure A ). Use a tin snips to cut the dripping perimeter to size.
Stand Safe
When it comes to roofs, even the best safety equipment is no substitute for common sense and good judgment. Now are some tips-off for working safely on a ceiling 😛 TAGEND
Leave steep and/ or high-pitched roof work to the pros. No amount of money you could save is worth the risk of death or a lifelong disability from a fail. A descent protection kit( harness, line and hit) only expenditure about $100 at home hubs. Humid ceilings are slippery. Wear shoes with soft rubber soles for additional traction. Deter the roof embroiled clean of grunge and debris. Everyone on the sand should wear a hard hat–even the most careful laborer can plummet a tool off the roof. Always examine and call out before convulsing anything down. Carefully arrangement lines and postponement cords so they’re not underfoot. Check the heavines rating on your ladder–it needs to hold you plus 80 lbs. Give the priorities in the ladder at least 3 ft. above the ceiling boundary so you’ll have something to hang on to as you step onto and off the roof. Never step on any of the ladder echoes above the ceiling. Provide up scaffolding to install the drip edge and first few trends.
Roll out the self-stick underlayment Stick on the underlayment
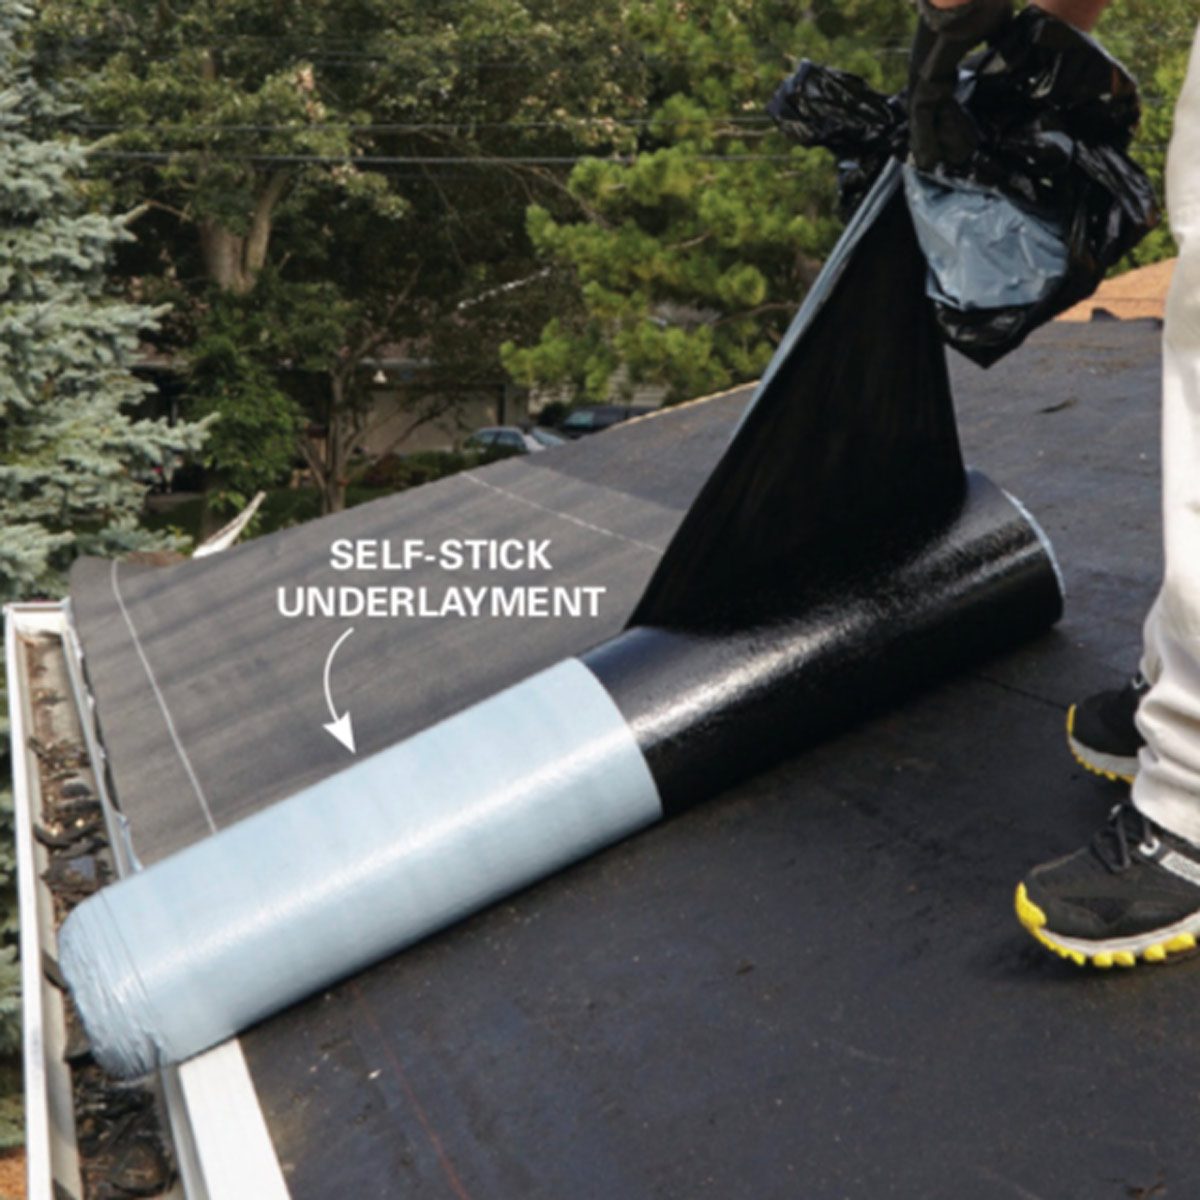
Protect the ceiling against ice embankments and windblown rain with self-stick ice-and-water underlayment. Peel off the top half of the plastic endorse as you unfurl the underlayment.
12 Roof Repair Tips: Find and Fix a Leaking Roof
Read more: familyhandyman.com


Have a look at these other posts:
 Amazon Workshop for Sellers Shifts Online, Nationwide
 Doubling Down With the Derricos: Karen & Deon Don't Get Government Aid to Raise 14 Kids
 NordVPN Download: How to put in on Android, Windows, Mac & extra
 Small Business Marketing Insights for 2020
 Overrated XI - The Argentinian striker who went from underrated to overrated
 H Reasons Everyone Needs a Personal Website
 Focus on stability sheets as an alternative of K&L in inventory choice: Shah
 Has Anyone Solved Black Pepper/Bird/Tropical Rodent Mites Infestation Inside Home?
 Derick Dillard: I Love Science... But Hate My In-Laws!
 Avs Go From the Basement to Contenders in O Years
 The Best Checking Accounts for Your Business
 Methods to unblock and watch American Netflix with a VPN
