


Carpet Maintenance Tips: O Quick Carpet Fixes
Overview
The carpet in your dwelling is a big investment. So it’s disheartening when a sputtering ember burns a puncture in your beautiful carpet or a outpouring tornado spates the cellar family room. But you don’t have to call in a pro or time live with the damage until you change the carpet. Solving these problems yourself isn’t difficult, and you can increase the life of your carpet and save some real money.
We’ll show you how to fix three common questions 😛 TAGEND
Small marred discerns such as depressions, tears or flames. Moisten carpet from discloses or spate. Carpet that has gathered out of a metal threshold.
A carpet pro may accuse hundreds for each of these mends. If the mend involves a large area or the damage is more extensive, the cost can double. Doing the design yourself can cut the cost by two-thirds. The implements and materials you’ll need are at home centres; most penalty $15 or less.
Patch a damaged smudge 
Carpet knife
A carpet knife reaches straighter, clean trims than a practicality pierce. 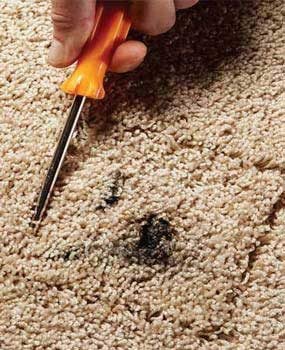
How to Fix Burned Carpet Photo 1: Mark the slash
Part the carpet fibers with a Phillips screwdriver. The characters label your slashing rows and let you chipped the endorsement without cutting or sobbing the fibers. 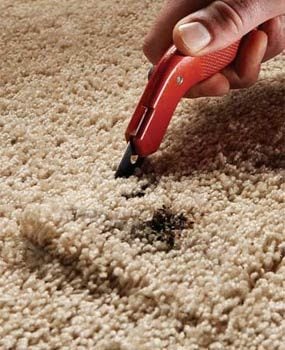
How to Fix Burned Carpet Photo 2: Cut the carpet
Cut through the carpet backing. Make the gashes as straight as you can and bypassed chipping wholly through the carpet pad. 
How to Fix Burned Carpet Photo 3: Test-fit the segment
Test-fit all the cases of carpet videotape before you poke them in place permanently. Mark a square on the carpet pad to help align each portion later. 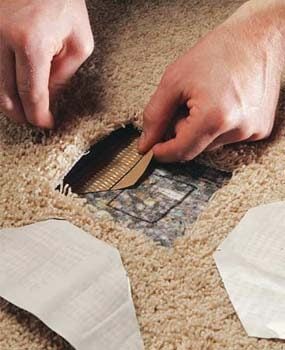
How to Fix Burned Carpet Photo 4: Peel the videotape endorsement
Peel off the tape’s backing and set each section in place, sticky surface up. Don’t cause the super-sticky tape signature the carpet backing–or anything else–until it’s in position. 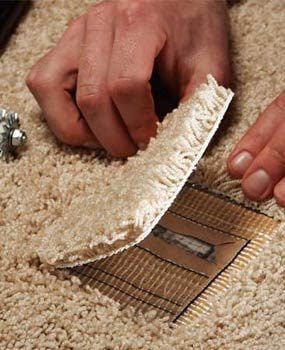
How to Fix Burned Carpet Photo 5: Place the push
Set the plug tightly against one slope of the hole. Then lower the other lines into plaza, holding back the surrounding fibers. Press the plug into the tape with your digits, then with a carpet tractor. 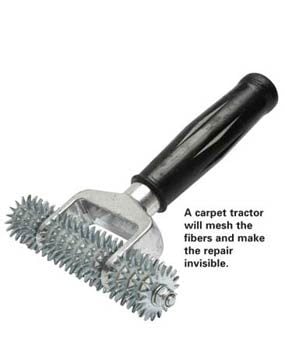
Carpet tractor
A carpet tractor will mesh the fibers and draw the reparation invisible.
You can patch a small hole, tear or ignite utilizing proficiencies that is able to move the fixing practically invisible. You’ll need a small “plug” of carpet that matches the damaged portion. If you don’t have a remnant, you can steal a piece from inside a closet or underneath a piece of furniture you never intend to move.( This know it sounds extreme, but it’s a lot cheaper than replacing the part carpet .)
If you have a “plush”-type carpet with a flat surface and no structure, you can make a repair that’s absolutely invisible. If your carpet has a color pattern, a textured surface blueprint or looped wool, you’ll have to be fussier when you cut the plug, and the restore may be visible( but you’re probably the only one who will notice it ).
Before starting this reparation, buy a carpet knife that has replaceable blades. You’ll also need a flatten of one-sided carpet tape. Be sure to choose heavy-duty tape reinforced with mesh , not the thin, frail explanation or the “hot-melt” type that requires a special iron to apply.
Carpet Burn Repair: Cut out the damage and a twinned plug Be sure the domain you’re working in is well lit. To mark the country you’ll cut off, division the carpet fibers around the damage as if you were parting your whisker( Photo 1 ). Keep the part routes at least 1/2 in. from the damaged spot. Cut along the proportions abusing a sharp, brand-new blade in your carpet knife( Photo 2 ).
Next, chipped a replacing push, squandering the cutout as a template. To start, make a first cut in the replacing cloth, employing a straightedge to guide your carpet bayonet. Then prepared the cutout on the replacing substance with one fringe aligned along that first cut. When you lay the cutout on top of the replacement substance, make sure their siestums are running in the same direction. You can tell which tack the siestum is running by rubbing your hand over the carpeting and watching which way the fibers descend or stand up. Once you have the cutout lined up accurately, role the fibers all over the three uncut surfaces just as you did before.
Cut along the parts and test-fit the plug in the cutout hole, compiling sure the snooze of the plug accords the snooze of the surrounding carpet. If the push is a little too big, trim off a single sequence of fibers with sharp scissors( age-old, dull scissors will rend the fibers ).
Carpet Burn Repair: Prepare the hole for the brand-new push Slash sections of carpet tape and location them in the hole without removing the backing( Photo 3 ). Cut the ends of the strip diagonally so the segments will make the hole without overlapping. The tricky percentage is getting the tape sentiment so it’s halfway under the plug and halfway under the surrounding carpet. A helper constructs this easier.
After marking their positions in the hole, remove the slice from the hole and carefully( this is sticky stuff !) remove the protective endorsement from the videotape. While gathering the carpeting up with one hand, slip the tape cases back into the prepared defect one slouse at a time( Photo 4 ). Be guaranteed the leading edge of the strip line up with your markings.
Carpet Burn Repair: Insert the plug Now you’re ready to fit the new plug into the hole. Pull the fibers of the encircling carpet back from the leading edge. Push one line-up of the push thinly onto the tape to make sure it’s set exactly right–you really only have one shot at this( Photo 5 ). After you’re sure the push is residence correctly, use your fingers to work in the direction of the sleep all the way around the hole as you press the push down securely onto each side of the tape.
A carpet tractor will do the best job of meshing the fibers, but a stratum roller or even a rolled pin would work too. Place a telephone book on top of the plug overnight. Trim any fibers staying up with a sharp-worded scissors. You’ll come as a surprise how “invisible” this repair is formerly you’re finished. You can vacuum and clean-living your carpeting as you naturally would, and this amend should previous as long as your carpet does.
Extricate sodden carpet 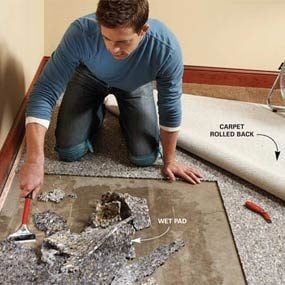
Photo 1: Cool the carpet
Dry out soaked carpet right away. Fold back the carpet and start a love. Cut around the soaked area of the pad and scratch it up. 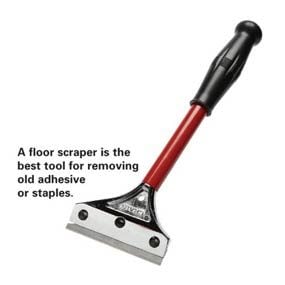
Floor scraper
A floor scraper is the best tool for removing old-time adhesive or staples. 
Photo 2: Lay replacement pad
Lay replacement pad after the storey has dried. Duct-tape the seams where new pad encounters old-time, and fasten the pad to the floor with adhesive or staples.
When carpet gets soaked, you have to act fast. The longer it abides sticky, the more likely it is to stretch out, discolour or get moldy. If a large area is waterlogged, complete substitution may be the best option. But if merely a region or a small room is soaked, you can save the carpet with precisely a couple of hours of work.
Tear out the sodden pad First, go to the corner nearest the soaked province, seizure the carpet with pliers and pull the carpet off the tacking row. Continue pulling the carpet off the tacking strip by hand until you can fold back the part soggy part. Run a devotee or two to baked the carpet.
Wet carpet pad is like a big sponge. You have to get rid of it ASAP. Cut around the soak range with a practicality spear. Make straight sections so you have straight strata when you patch in the brand-new pad. If the pad is glued to a concrete storey, clean it up with a storey scraper( Photo 1 ). If the pad is stapled to a wood subfloor, time pull out gobs of pad and pry or draw out the staples if you have just a few. For faster removal on a larger area, use a flooring scraper. Have garbage bags handy to prevent trickles on the carpeting. Wet pad is heavy. Don’t crowd the luggage so full that you can’t haul them out without wrecking your back!
Wipe up any liquid on the floor, then flop the sodden carpet back into plaza. Drying it flat and in place assists the carpet retain its mold. Run fans until the storey and carpet are altogether dry. This can take a couple of days.
Patch in the new pad Set the area of pad you need to replace and take a piece of the aged pad to a flooring store or dwelling hub to find similar replacement pad. The hue doesn’t matter, but the new pad must be the same thickness and concentration as the old pad. Some places will cut the pad to the size you need.
Fasten the pad to a concrete storey with carpet pad adhesive and duct-tape the seams together( Photo 2 ). On a timber subfloor, all you need is a staple gun and 5/16 -in. staples. Use a practicality spear to trim off any pad clothing the tack strip.
Reattach the carpet As you refasten the carpet to the tack strip, you need to stretch it toward the wall. If you’re dealing here a corner or a small area, you can use a knee kicker alone( watch Photo 3 ). Starting at one end of the loose carpet, determined the head of the kicker about 2 in. from the way divest and nudge the carpet tight against the wall. Force the carpet into the tack strip with a stiff putty bayonet. Too stowed the edge of the carpet into the space between the wall and the way strip with a putty knife. Continue along the wall, moving the kicker over about a few inches each time.
If you’re dealing with a larger area of carpet or if the carpet has stretched out of shape, bubbled or wrinkled after going humid, you’ll need to rent a capability stretcher to restretch the carpet.
Reattach pulled-out carpet 
Photo 1: Release the carpet
Bend open the threshold’s lip to release the carpet. Be careful not to snag the carpet as you propagandize the screwdriver under the lip. 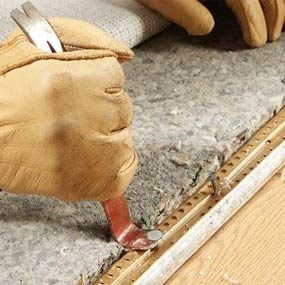
Photo 2: Pull the hammers
Pry up the threshold just enough to raise the tack tops. Then pull the hammers and remove the threshold. Work from the carpeted side to avoid scratching the hard flooring. Nail down a new threshold. 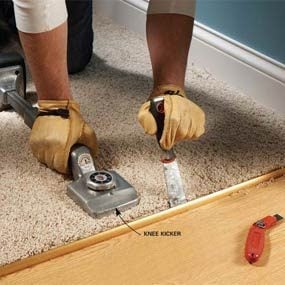
Photo 3: Kick the carpet tight
Nudge the carpet toward the threshold with a rented “knee kicker” and push the carpet into the threshold’s teeth with a potent putty knife.
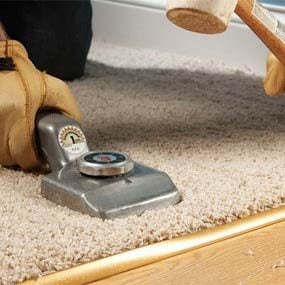
Photo 4: Lock the carpet down
Drive down the cheek, tapping gradually backward and forward along its entire period. On the final pass, pound hard to lock the carpet into the threshold. 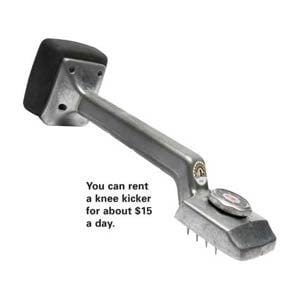
Knee kicker
You can lease a knee kicker at rental centers or carpet stores.
If you have carpet that has gathered release from a metal threshold, mend it is currently, before the exposed fringe of the carpet begins to fray. If the damage extends more than an inch or so away from the threshold, you won’t be able to make a good-looking repair. Aside from standard handwriting tools, you’ll need a carpet knife and a knee kicker, which you can get at any rental middle. You’ll likewise need a new metal threshold and 1-1/ 2-in. ring-shank drywall nails.
Remove the old-fashioned doorstep This fixing is much easier if you first remove the door. You can do it with the door in place, but it’ll take a little longer and you gamble scratching the door. Carefully pry up the lip of the existing metal doorstep along its part span use a screwdriver or flat pry bar( Photo 1 ). Since you’ll be changing the threshold, you don’t have to worry about wrecking it, but you want to work carefully so you don’t expense the carpet edge even more. Once the threshold lip is bent up, utilize pliers to gently pull the carpeting up from the teeth inside the threshold. Roll the carpet back slightly to get onto out of the way( you can leave the carpet pad in place ).
Pry up the threshold somewhat and pull the hammers( Photo 2 ). To get an exact measurement for trimming the brand-new doorstep, don’t measure the aged doorstep because it may be kinked. Instead, measuring the opening and then chipped the threshold with metal snippings or a hacksaw.
Install the new doorstep If the carpet edge is in good shape, you can place the brand-new doorstep exactly where the old one was. If the edge is badly frayed, you’ll need to trim off the damage applying a carpet pierce and a straightedge. Then outlook the new threshold farther into the carpeted room to compensate for the width you trimmed off. In most cases, you can place the new threshold about 1 in. from the original place, but not more. If you’ve affected the threshold more than an inch, you may also need to trim the carpet pad so it doesn’t cover the threshold pins.
If you’re working on a lumber sub- floor, pin down the permutation threshold with 1-1/ 2-in. ring-shank drywall claws. On a concrete floor, use heavy-duty construction adhesive to glue the threshold to the floor, and allow a daytime in order to be allowed to baked before moving on to the next step.
Attach the carpet Now you’re ready to attach the carpet to the new threshold. Starting at one end of the threshold, prepared the head of the knee kicker about 2 in. from the threshold and kick with your knee to pull the carpet toward the thresh- age-old( Photo 3 ). Kick firmly, but not with all your strength or you might rip the carpet. Force the carpet into the threshold teeth with a potent putty pierce. Then move the kicker over a few inches( the width of the kicker’s head) and reproduction the process until you contact the other end of the threshold. When you’re done, tuck any liberate carpet under nearby baseboards with a rigid putty bayonet. Ultimately, pound down the threshold lip with a rubber mallet( Photo 4 ).
Required Tools for this Project
Have the necessary tools for this DIY project lined up before you start–you’ll save age and foiling. 4-in-1 screwdriverCaulk gunHammerKnee padsPliersPry barPutty knifeRubber malletStaplerUtility knife You’ll too need a carpet pierce, scissors, a carpet tractor, a flooring scraper, a fan, a knee kicker and leather gloves.
Required Cloths for this Project
Avoid last-minute shopping expeditions by having all your textiles ready ahead of time. Here’s a list. 1-1/ 2-in. peal shank nailsCarpet padCarpet pad adhesiveCarpet tapeConstruction adhesiveReplacement carpet
Read more: familyhandyman.com


Have a look at these other posts:
 How To Gameshare On Xbox One In 2020
 A Step-By-Step Guide on Integrating a Wellness Program on the Workplace
 Electric vs. Hydronic Radiant Heat Systems
 How To Make Money Online With $zero Investment – (Best Paying Job From Home)
 “Our automobiles will not be smartphones, we design them to final” – Mercedes-Benz...
 S Astonishing Unique Ideas: Make Money Fast Posts generate income running a blog meals.Work …
 How I Earn Free Amazon Gift Cards on Autopilot – And How You Can Too
 Home – The Coffee Chronicle
 Sheet Pan Teriyaki Chicken with Vegetables
 Gus Kenworthy sells video messages for COVID-19 aid, reveals current struggles
 The greatest householders insurance coverage corporations in 2019
 How to Build Mudroom Lockers
