


How to Build Mudroom Lockers
Hide the mess with mudroom lockers with doorways 
Meet the pro
Spike Carlsen is a carpenter, columnist and onetime writer at The Family Handyman. You knows where to find his diaries in stores and at online booksellers.
My daughter, Kellie, recently bought a nice little live with a neat big coat closet by the front door. The problem is, since the garage is in the back, everyone, including the dog, uses the back door.
I designed and built these hide-the-mess lockers with people like Kellie in mind. Each locker is big enough to stash a hair, knapsack, boots, hats, and odds and ends that normally wind up on the floor. Since they’re modular and seat efficient, you can build one for each member of the family–including the dog( leashes, dolls, menu, you referred it ). Now everyone has a personal place for stashing stuff–and the responsibility for keeping it organized.
The louvered door is made from one of a duo of closet bifold doors, which you can buy at almost any home center. Since the doors come in duets and you can get two locker “boxes” from each sheet of plywood, you’ll clear the best use of materials by structure them in twos. Here’s how to do it.
Timber cupboards for mudroom: coin, the documentation and tools
My total substances penalty was just under $100 per cupboard. Since I expresses its intention to cover the cupboards, I used inexpensive “AC” plywood. If you plan to stain your lockers, and use hardwood plywood such as oak or birch and hardwood entrances, you’ll spend about $150 per cupboard. On a row of the mudroom lockers with doors, merely the outer backs of the end cupboards indicate, so you can use inexpensive plywood for the inner parts and more expensive material for the outer fractions. Expect to deplete at least a day buying fabrics, rounding up tools and constructing a duet of cupboards. Set aside another epoch for finishing.
A table visualize is helpful for cutting up plywood, but a circular recognize with a navigate will provide the same reactions( construe Two Essential Saw Cutting Guides ). You’ll also need a miter discover to cut the screen molding. A finish nailer will help you work faster, but hand-nailing will work too as long as you drill holes to prevent splitting.
Buy the doors firstly
There are a variety of bifold openings available. If you need more ventilation, use full louvered entrances; if breathing isn’t an issue, use solid entrances. The doors you buy may not be exactly the same size as mine, so you may have to alter the dimensions of the boxes you build. Here are two key points to keep in mind as you plan your programme 😛 TAGEND
You crave a 1/8 -in. chink bordering the door. So to determine the size of the box opening, add 1/4 in. to the height and diameter of the door. Since my bifold doorways measured 14 -3/ 4 x 78 -3/ 4 in ., I formed “todays opening” 15 x 79 in. To adjudicate the depth of the shelves, subtract the door thickness from the width of the sides( includes the 1/4 -in. screen molding ). My entrances were 1-1 /8 in. thick-witted, so I manufactured the shelves 10 -7 /8 in. penetrating( 12 minus 1-1 /8 equals 10 -7 /8 in .). When the doors are closed, they’ll rest against the shelves inside and flush with the screen molding outside.
Get building these mudroom lockers with doorways! 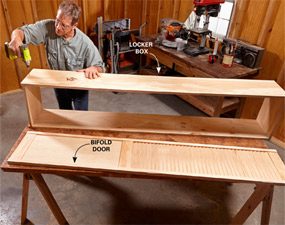
Photo 1: Build a simple box
Cut the plywood parts and assemble them with trim-head jailers. Make sure the box opening is 1/4 in. taller and wider than the door itself.
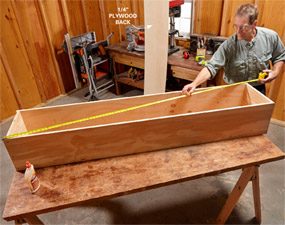
Photo 2: Square it up
Take oblique corner-to-corner evaluations, then adjust the box until the measurements are equal and the box is square. Reinstalling the back, using one advantage of the back to arrange the box side as you lodge it. Check once again for squareness, then secure the other fringes of the back.
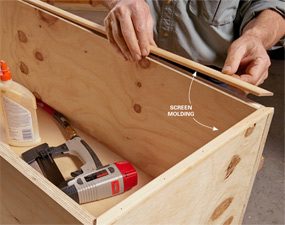
Photo 3: Cover the plywood advantages
Install screen molding over the front edges of the box. Apply wood glue delicately and use just enough fingernails to “clamp” the molding in place while the adhesive dries.
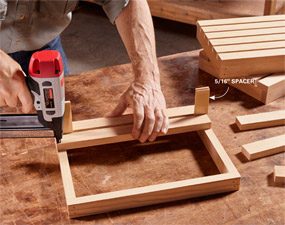
Photo 4: Build slatted shelves
Plywood shelves would work fine, but slatted shelves permit better ventilation so wet drapes and shoes can bone-dry. Space the slats with a pair of lumber scraps.
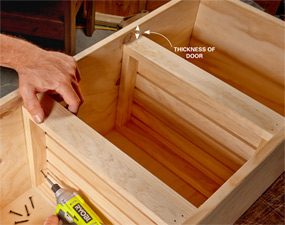
Photo 5: Install the shelves
Stand your locker up and position the shelves to suit the stuff that will go in it. Mark the rack places, lay the locker on its back and screw the shelves into home. Make sure the shelves are inset far enough to allow for the door.
Use a table observe or straight-cutting guide to cut the plywood places( A) and transcend and bottom( B ). The Cutting List( envision Additional questions, below) gives the sides magnitudes for my lockers. If you plan to paint or discolour the mudroom cupboards, it’s a good intuition to prefinish the insides of fractions. Once the lockers are assembled, brushing a finish onto the insides is slow and difficult.
Assemble the boxes with 2-in. trim-head fastens( Photo 1 ). Trim-head bolt have smaller heads than standard screwings and are easier to hide with filler. Cut the 1/4 -in. plywood back( C) to size( participate Figure A ). Make sure-fire the box is square by do diagonal measurings( they should be equal; encounter Photo 2 ), and then secure the back squandering 1-in. nails. Use the edges of the back as a steer to arrange the leading edge of the box as you hammer the back into place.
Cut 1/4 x 3/4 -in. screen molding and use glue and 1-in. finish claws or brads to fasten it to the exposed front edges of the plywood( Photo 3 ). Cut the rack front and back( D ), sides( E) and slats( F) to segment, then assemble the three slatted shelf forces( Photo 4 ). With the locker box standing upright, importance the shelves and harbour them temporarily in place with clamps or a couple of screws. Adjust the rack spacing based on the height of the locker’s user and the stuff that will go inside. Once you have a suitable arrangement, lay the mudroom locker on its back and fasten the shelves into target( Photo 5 ). The shelves are easy to reposition in the future as needs change.
Figure A: Locker Construction
Overall Dimensions: 16-1/2” wide x 81′ towering x 12 -1/ 4” deep
See the Material List and Cutting List in Additional questions, below.
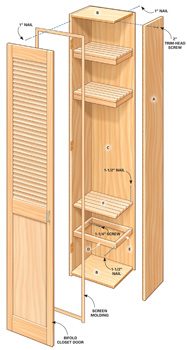
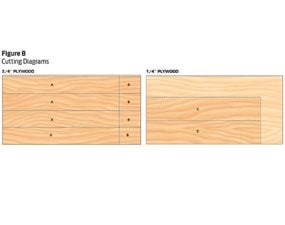
Figure B: Cutting Diagrams
To evaded wasting plywood, follow these cutting layouts for the 3/4 -in. and 1/4 -in. plywood.
Add the hardware and finish, and then install 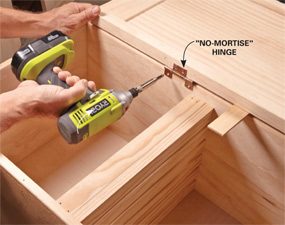
Photo 6: Mount the hinges
Remove the hinges from the doors( they’ll be placed the wrong way) and reinstall them on the door based on the direction you want it to swing. Prop up the door alongside the box and align the door so there will be a 1/8 -in. gap at the top and bottom of the box. Then clamped the hinges to the box.
Remove the hinges that hold the bifold entrances to one another. Determine which style you miss the door to fluctuating, then mount the hinges onto the door accordingly.( Note: You’ll need to buy another set of hinges if you’re building two cupboards .) Remember, you demand the louvers to object downward on the outside! With the locker on its back, orientation the door and secure the hinges to the plywood side( Photo 6 ). Install door handles and magnetic catches to hold them closed.
Remove the doors( but don’t finish them hitherto !) and install the locker cartons. Your lockers can stand against baseboard, leaving a small gap between the backs of the lockers and the wall. Or–if you withdraw existing baseboard& panache; they can stand tighten against the wall. Either way, installing them is a lot like installing lockers: Fasten all the boxes together by driving 1-1/ 4-in. fucks through the side of one locker into the next. Then clamped the entire assembly to wall studs.
Install the unfinished openings got to make sure they all set properly, then remove them again. This looks like a waste of time, but there’s a good reason for it: Your locker boxes may have shifted a little during installation, and the doors may not fit properly. If a entrance or two need some margin sanding, you just wanted to do that before finishing.
When you’ve checked the match of all the doors, should be eliminated one last duration for finishing. Whether you’re working coat or a natural finish, louvered openings are a real pain. If your strategies include a clear coat, consider polyurethane or wax in spray can: You’ll get better outcomes in far less time, though you’ll spend an a little extra. After finishing, install the doors and load up those mudroom lockers with doorways!
Additional Information Figure A: Locker Construction Material List( for two cupboards ) Cutting List( for one cupboard ) Figure B: Cutting Diagrams
Required Tools for this Project
Have the necessary tools for this DIY project lined up before you start–you’ll save era and foiling. 4-in-1 screwdriverAir compressorAir hoseBrad nail gunCircular sawClampsCordless drillDrill bit setFraming squareGlueHearing protectionMiter sawOrbital sanderPaintbrushPutty knifeSafety glassesSelf-centering drill bitTable sawTape measure
Read more: familyhandyman.com


Have a look at these other posts:
 Work From Home: Make Money In Network Marketing – Strategy For Passive Income 2019
 All eighty four startups from Y Combinator’s S19 Demo Day M
 Sorry, I Don’t Want to Pay for More Bombs: Bitcoin as a Hedge Against Funding War
 MAKING MONEY FROM HOME, MAILING POSTCARDS AT HOME, GET PAID DAILY, CASH IN YOUR MAILBOX CLUB
 Make Money From Home – How To Make Money From Home – How To Make Fast Money
 Where to seek out and apply for COVID-19 monetary aid
 Companies guarantee protected workplace setting for workers
 A Fun Pretzel Recipe That’ll Create Tasty Memories
 How to observe PGA Tour Charles Schwab Challenge stay stream anyplace
 S Great Ways to Make Money From Home
 Nintendo Restocks Animal Crossing Amiibo Cards To Hamper Scalpers
 S Counterintuitive Ways to Bolster Your Relationship
